

An effect you see used quite often on TV shows with a lot of action is a split screen side by side view of two camera angles. This effect can be done easily in Premiere Pro with the help of a few calculations and the Motion effects properties.
In this tutorial, learn how to use motion properties to achieve a horizontal split screen in Premiere Pro. You’ll learn the technique for applying this to different resolutions from 4K and beyond.
Horizontal Split Screen in Premiere
4K Footage
(Shown at 0:08 in video)
1. Place your two clips above each other on the timeline. So you should have one clip on Track 1 and your second clip on Track 2 for example.
2. Select your clip on the top track and open the Effect Controls for it.
3. Divide the Scale in half. So 100 / 2 = 50.0 for the Scale.
4. For the Position property, take the first value and DIVID that in half. 1920 / 2 = 960. Set the first value in the Position to 960 and the clip will move to the left.
5. Select the second clip on the bottom track and open the Effect Controls.
6. Divide the Scale in half. So 100 / 2 = 50.0 for the Scale again.
7. For the Position property, take the first value and ADD the value from the Position of the left clip. 1920 + 960 = 2880. Set the first value in the Position to 2880 and the clip will move to the right.
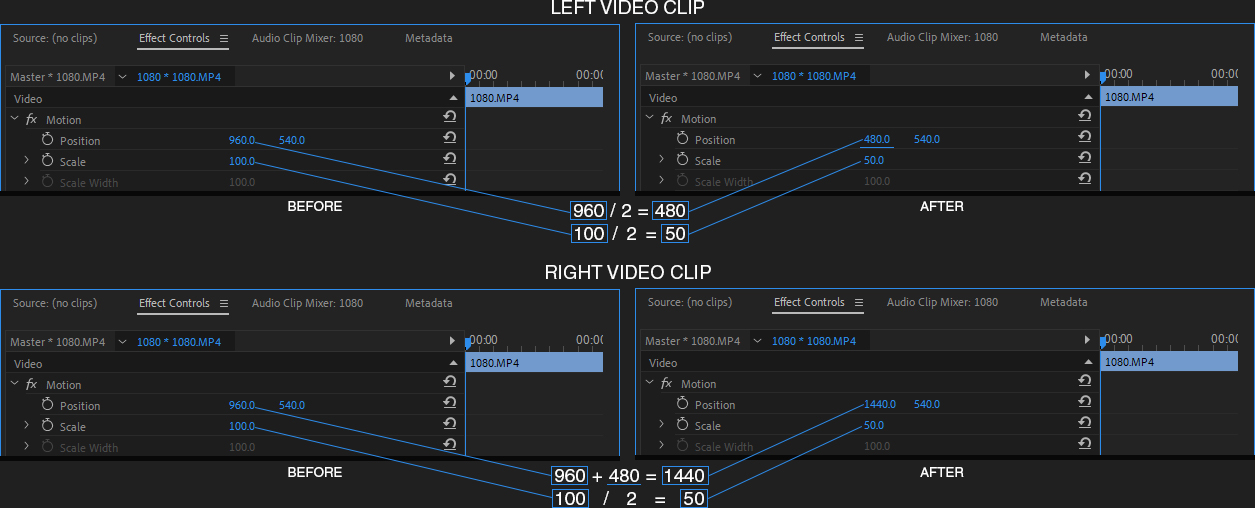
1080p Full HD Footage
(Shown at 2:11 in video)
1. Place your two clips above each other on the timeline. So you should have one clip on Track 1 and your second clip on Track 2 for example.
2. Select your clip on the top track and open the Effect Controls for it.
3. Divide the Scale in half. So 100 / 2 = 50.0 for the Scale.
4. For the Position property, take the first value and DIVID that in half. 960 / 2 = 480. Set the first value in the Position to 960 and the clip will move to the left.
5. Select the second clip on the bottom track and open the Effect Controls.
6. Divide the Scale in half. So 100 / 2 = 50.0 for the Scale again.
7. For the Position property, take the first value and ADD the value from the Position of the left clip. 960 + 480 = 1440. Set the first value in the Position to 2880 and the clip will move to the right.
That’s all there is to it! This will work with any size footage as long as you follow the same formula from above.
Removing the Black Bars
(Shown at 2:59 in video)
1. Go to Sequence > Sequence Settings… in the menu.
2. Divide the Height (Vertical Value) in half. So 1080 / 2 = 540 for the second field of the video Frame Size.
3. Press OK and OK for the warning to reveal the results.
Please note: Though this will remove the black bars, not all devices will support this resolution.
Comments